Hieroglyphs

Hieroglyphics is the type of writing most people associate with Ancient Egypt. It featured characters that looked like pictures, and could stand for either sounds or the objects depicted (depending on context).
BUT, it was not the only type of writing being used in Egypt at this time....and not even the most common type.
Hieratic Writing
(and a few hieroglyphs too)
(and a few hieroglyphs too)

Most Egyptians used a form of writing known as hieratic. It derived from hieroglyphics but was used alongside it (sort of like we have printing and cursive). Over time the two forms of writing began to have different functions. While priests and monument carvers still used hieroglyphics to record things of religious and historical importance, merchants and traders and everyone else used hieratic to write their grocery lists, records, and love notes.
You can see in the examples of both hieratic and hieroglyphics in the ancient religious text shown above (hieratics make up the main body of the text written under the scene at the top, but in the top right corner above the seated women you can see hieroglyphs).
Documents like these would usually be written on papyrus, a type of woven paper, or sometimes on animal skins--both of which were time consuming to make and therefor expensive. But the common people, the laborers and farmers and traders, if they could write wrote their hieratic notes on flat limestone rocks, and broken bits of pottery, which were cheap and readily available.
Egyptian Writing
and Scribes Pallet Craft
Kids learning to be scribes in Egypt would practice writing on flat rocks and broken pottery ...it is just as "historical" as writing on papyrus. So, for this activity I gathered up smooth rocks at a local garden center, and also broke up an old terra cotta pot. I explained a little bit about the history of both styles of Egyptian writing and game them some sample alphabets of both. I had them choose a terra cotta shard, or a rock, to paint hieroglyphs and hieratic on with red and black paint (the most commonly used ink colors in ancient Egypt).
I also made reed "brushes" and scribe pallets (a craft I found in Make It Work: Ancient Egypt) for the kids to use. You could have older kids make these themselves, but the craft does involve using an sharp knife. Alternatively you could pre-cut the pieces and have kids glue them together and make the indentations for the ink themselves.

HIEROGLYPHS AND SCRIBES PALLET CRAFT
SUPPLIES:
For Stone Painting
- Red and Black Paint (goes in Pallet if you make that)
- Flat-ish stones and/or a terra-cotta pot (and hammer + trash bag or safety glasses)
- Balsa wood strips (find at hobby store)
- Harder wood strips for base (optional...see note in instructions)
- Wood Glue
- Round object (see step 8)
- Cardboard to cut on (a cereal box folded flat works well)
- Utility Knife

For Reed "Brushes":
- Any old reed-like weedy grass
- Scissors
Guide for Writing Hieroglyphs and Hieratics
Egyptian Alphabet Comparison Sheet
INSTRUCTIONS
1. Collect stones or break a terra-cotta pot. It's a toss up which is better to use. The terra cotta is smoother and easier to paint on, but has jagged edges (though not as sharp as glass). Many garden centers have stones you can buy, or will not mind you taking smaller broken pieces from larger flat stones they sell. But if you choose to break a terra cotta pot with a hammer in stead, wear safety glasses OR put the pot in the plastic trash bag before breaking to keep broken bits from flying up. Make sure to sweep area thoroughly afterwards. (Fun alternative if you have a second story: clear all people from the area and toss the pot from a 2nd story window. You can tell I enjoy destruction...just a bit).
2. For the pallet, I liked using Balsa wood strips for the top part, but a harder wood strip in the same size for the back, to add strength. Because I was making several of these it was actually cheaper to do this (the harder wood cost less than balsa), but if you were making just one it would cost less to cut one strip of balsa in two and use it for both top and bottom. I found my pre-cut wood strips at Hobby Lobby.
4. Cut the bottom and top strips to exactly the same length (8 - 10 inches).
5. The original craft called for cutting out the ink wells with a craft knife, but I thought it would be easier to press them in the soft balsa wood in stead (you can see how this turned out in the pictures). It does make for a shallower bowl, so if you want to cut them out with a knife for a deeper ink well, do so during this step. Otherwise, I think it would probably avoid some of the warping I got later to press them after gluing (though I have not tried this) For the area to hold your reeds cut a rectangular strip from near the bottom of the top later of balsa wood...leaving about two inches at the top for your inkwells, as shown below.
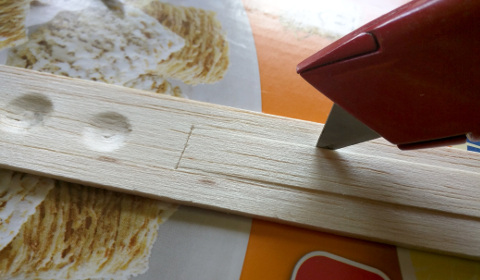
7. Glue your top balsa piece to your bottom wood piece...put a book on top to press them pieces together while they dry.
8. To press out your inkwells (if you haven't choosen to cut them in step five), find a hard object with a small rounded surface. I used the handle of a small hammer. You could also use a screwdriver handle or even a marble. Press the rounded object into the balsa wood hard until it makes an indentation. (The example below shows only one layer because I made the mistake of pressing before gluing the top and bottom layers).

This is one step that even a young child can help with. Wha-la...your scribe's pallet is done...now it need some reeds to fill it.
9. Go outside and look for some weedy grass...something long and skinny, not wide and flat. Cut off any "seed heads" and cut into segments just shorter than your reed holder.

10. Last, put a drop of red and black ink in your pallet inkwells, grab your rocks or terra cotta pieces, and start painting hieroglyphics and hieratics (this page can be used for a reference)!
Shared on Throwback Thursday