Showing posts with label Historical Occupations. Show all posts

Friday, April 2, 2021

Cuneiform Craft


Cuneiform was one of the earliest types of writing.   It started in Mesopotamia, and was used by various cultures including the Assyrians and Babylonians and early Persians.  

Writing your name or a message in cuneiform can be a fun way for kids to explore ancient Mesopotamian history.   But to write cuneiform you need a certain type of stick with an edge to it.  This will be your cuneiform stylus. 


STYLUSES

We made our own cuneiform styluses by cutting a stick so it has a flat end,  and then carving the end in the shape of a triangle.   It's really quite easy...if you can use a knife to whittle off the bark of a stick you can do this.  

But if you don't feel like carving, there's another option.   Chop sticks (the wooden kind they give you at Chinese restaurants) already come with a flat edge.   The end of the chopstick is in the shape of a square,  not in the shape of a triangle, but it will still work for many of the cuneiform alphabets as it still gives you that wedge shape.   The only shape you can't do is a straight down triangle stamp, which not all cuneiform alphabets use.   

A third option for styluses is to buy dowels and then cut them to smaller sizes (crayon size is generally good.)

PREPPING THE CLAY

Next, you flatten out a piece of play dough or air dry clay (which can be bought at Hobby Lobby, Micheal's, and various other hobby stores).    If using clay I suggest doing this on a surface like a Plastic baggie (which can also be used to store the clay beforehand), since clay tends to stick to stuff.  You can put the clay in the baggie and something like a plate or rolling pin to press it flat.   You can also  plastic place mat or  paper plate, and cover it with plastic wrap to keep it from sticking to whatever you use to press it flat. 

WRITING IN CUNEIFORM

Then, using one of the alphabets linked below (under the video) use the method shown in the video to make your cuneiform.  Notice how he uses the edge to make wedge shaped impressions. You don't need to "trace" out triangles, but use the natural shape of the stylus to make those for you.


Now, we did our cuneiform with real air dry clay (easy, and you get that feel of real clay,  but it's fragile after it dries).  I've heard of people using salt dough or play dough too, but my favorite method I've seen (but not yet tried) is cuneiform gingerbread cookies!

Here are some cuneiform alphabets you can try.   Note though, that most (maybe all) of these were actually syllabaries (where one symbol often stood for a whole syllable, not just a single sound like in the English alphabet).  Also, some of these languages didn't use the same sounds as we do in English.  So when you see a cuneiform "alphabet," it is likely an approximation (but that's good enough to help kids explore what it was like to write in cuneiform).  

  • Ugaritic Alphabet (c. 1300 BC ) More about it.
    • The cuneiform is fairly simple to write, but the one I have is not in alphabetical order, and uses some international symbols for sounds.   It doesn't contain all the English letters/sounds so you might have kids make up their own cuneiform letters for the letters they didn't have.  
  • Old Persian Alphabet (c. 550-486 BC).   
    • This was created by or under Darius I, who is mentioned in the biblical books of Haggai, Zechariah, Ezra, and Nehemiah (for those supplementing with Bible stories, around Chap 21 of SOTW).   It is also not too complex to write.  It's also not in alphabetical order, and is presented as a syllabary (but a very simple one...if kids wanted to try out the idea of using a syllabary this would be a good one to do that).  Again, it doesn't contain all the English letters.
  • Babylonian Alphabet and Numbers (c. ?)  and  More Babylonian Numerals (c. 2000 BC)  
    • This has all the English letters, even c (which is redundant with k and s), so it's definitely at best an approximation.  These are COMPLEX characters to make, but it is nice to have all of it in alphabetical order without having to mess with syllables.   It also has numbers 1-20.
  • Sumerian Syllabary (c. 2200 BC)  
    • First phonetic cuneiform, and kinda complex but older students might enjoy looking at it (symbols were by syllables,  so "ba, be, bi, bu" would all be separate alphabetic symbols).  Some modern scripts, such as Japanese, are structured similarly.  There is a simplified sumerian "alphabet" here though. 
   Then just let your creation air dry, for for more sturdiness, bake it. 
 

We made some other clay creations after playing with cuneiform - my son made the vase and I mad the crocodile.  (I was pretty proud of that crock...used the triangle end of stylus like a stamp to make the scales on his back)

Saturday, November 5, 2016

Egyptian Writing Activity

There's something interesting that you won't find in most kids books on Egypt ...that there were TWO types of writing used in in Egypt.

 Hieroglyphs


Hieroglyphics is the type of writing most people associate with Ancient Egypt.  It featured characters that looked like pictures, and could stand for either sounds or the objects depicted (depending on context).

BUT, it was not the only type of writing being used in Egypt at this time....and not even the most common type.


Hieratic Writing
(and a few hieroglyphs too)


Picture by Nic McPhee - From British Museum - Adapted Under Creative Commons

Most Egyptians used a form of writing known as hieratic.   It derived from hieroglyphics but was used alongside it  (sort of like we have printing and cursive).   Over time the two forms of writing began to have different functions.    While priests and monument carvers still used hieroglyphics to record things of religious and historical importance, merchants and traders and everyone else used hieratic to write their grocery lists, records, and love notes.

You can see in the examples of both hieratic and hieroglyphics in the ancient religious text shown above (hieratics make up the main body of the text written under the scene at the top, but in the top right corner above the seated women you can see hieroglyphs). 

Documents like these would usually be written on papyrus, a type of woven paper, or sometimes on animal skins--both of which were time consuming to make and therefor expensive.   But the common people, the laborers and farmers and traders, if they could write wrote their hieratic notes on flat limestone rocks, and broken bits of pottery, which were cheap and readily available. 


 Egyptian Writing 
and Scribes Pallet Craft

Kids learning to be scribes in Egypt would practice writing on flat rocks and broken pottery ...it is just as "historical" as writing on papyrus.  So, for this activity I gathered up smooth rocks at a local garden center, and also broke up an old terra cotta pot.  I explained a little bit about the history of both styles of Egyptian writing and game them some sample alphabets of both.   I had them choose a terra cotta shard, or a rock, to paint hieroglyphs and hieratic on with red and black paint (the most commonly used ink colors in ancient Egypt).


I also made reed "brushes" and scribe pallets (a craft I found in Make It Work: Ancient Egypt) for the kids to use.   You could have older kids make these themselves, but the craft does involve using an sharp knife.  Alternatively you could pre-cut the pieces and have kids glue them together and make the indentations for the ink themselves. 


HIEROGLYPHS AND SCRIBES PALLET CRAFT

SUPPLIES:

For Stone Painting
  • Red and Black Paint (goes in Pallet if you make that)
  • Flat-ish stones and/or a terra-cotta pot (and hammer + trash bag or safety glasses) 
For Scribe's Pallet:
  • Balsa wood strips (find at hobby store)
  • Harder wood strips for base (optional...see note in instructions)
  • Wood Glue 
  • Round object (see step 8)
  • Cardboard to cut on (a cereal box folded flat works well)
  • Utility Knife


For Reed "Brushes":
  • Any old reed-like weedy grass
  • Scissors

Guide for Writing Hieroglyphs and Hieratics
Egyptian Alphabet Comparison Sheet


INSTRUCTIONS

1.  Collect stones or break a terra-cotta pot.  It's a toss up which is better to use.  The terra cotta is smoother and easier to paint on, but has jagged edges  (though not as sharp as glass). Many garden centers have stones you can buy, or will not mind you taking smaller broken pieces from larger flat stones they sell.  But if you choose to break a terra cotta pot with a hammer in stead, wear safety glasses OR put the pot in the plastic trash bag before breaking to keep broken bits from flying up.  Make sure to sweep area thoroughly afterwards.  (Fun alternative if you have a second story:  clear all people from the area and toss the pot from a 2nd story window.  You can tell I enjoy destruction...just a bit).

2.  For the pallet, I liked using Balsa wood strips for the top part, but a harder wood strip in the same size for the back, to add strength.  Because I was making several of these it was actually cheaper to do this (the harder wood cost less than balsa), but if you were making just one it would cost less to cut one strip of balsa in two and use it for both top and bottom. I found my pre-cut wood strips at Hobby Lobby.

4.  Cut the bottom and top strips to exactly the same length (8 - 10 inches). 

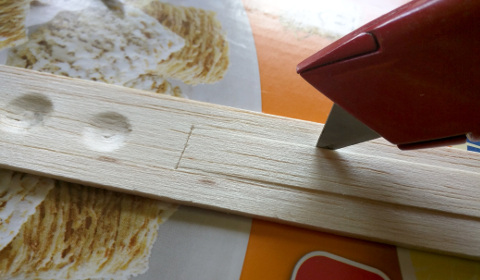
5.  The original craft called for cutting out the ink wells with a craft knife, but I thought it would be easier to press them in the soft balsa wood in stead (you can see how this turned out in the pictures).  It does make for a shallower bowl, so if you want to cut them out with a knife for a deeper ink well, do so during this step.   Otherwise, I think it would probably avoid some of the warping I got later to press them after gluing (though I have not tried this)   For the area to hold your reeds cut a rectangular strip from near the bottom of the top later of balsa wood...leaving about two inches at the top for your inkwells, as shown below.


7.  Glue your top balsa piece to your bottom wood piece...put a book on top to press them pieces together while they dry. 

8. To press out your inkwells (if you haven't choosen to cut them in step five), find a hard object with a small rounded surface.  I used the handle of a small hammer.  You could also use a screwdriver handle or even a marble.  Press the rounded object into the balsa wood hard until it makes an indentation.  (The example below shows only one layer because I made the mistake of pressing before gluing the top and bottom layers).


This is one step that even a young child can help with.  Wha-la...your scribe's pallet is done...now it need some reeds to fill it.


9.  Go outside and look for some weedy grass...something long and skinny, not wide and flat.  Cut off any "seed heads" and cut into segments just shorter than your reed holder.


10.  Last, put a drop of red and black ink in your pallet inkwells, grab your rocks or terra cotta pieces, and start painting hieroglyphics and hieratics (this page can be used for a reference)!


Saturday, May 28, 2016

Marketplace: Brick Making Suggestions


Back in 2010 our church did the Egypt VBS that Group is putting out again this year.  I worked in the Marketplace making mud bricks, and I can tell you, it was a blast.  It's cheap, fun and really does give kids a good idea about life in Egypt (or lots of places in the middle east, really...where most people made their houses out of mud bricks).

Here's my brick making suggestions:

THE DIRT ON BRICK DIRT
Group has instructions for making bricks, but for those not using this program, you can find instructions on the Biblical Archaeology website, or you can just experiment with your own mix of mud, straw, and water.  Note that Group instructions skip steps 3 and 4, for obvious reasons--who has time for prepping mud for 5 days for a simple kids project?  Turns out the straw was used because it releases humic acid which makes for really strong bricks--so the four days of mud stomping was to give time for fermentation and to mix the acid from the straw through the mud.  For VBS craft purposes, less strong bricks will do...but if you were doing this for homeschool I could see how going through the whole 5 day process might be educational.   

I'd say in most cases it's better to get regular straight out of the ground dirt if you can (especially if you live in a place like Texas where the ground is literally called Texas clay).  Garden soil or sand does not make especially sturdy bricks, but the bricks I made out of "Texas clay" from my backyard ...that dried rock hard and solid.  You can ask volunteers to each bring a bucket of dirt from home or you can talk with a construction company to see if they have any extra "out of the ground" dirt you can use.   As for straw, we didn't chop our straw up in little pieces and the big pieces did make our bricks less stable.   Chopping up straw is time consuming so I suggest involving the kids in this step.  Kids love cutting up things into tiny pieces anyways and you can cut up straw with scissors.   


BRICK MOLDS
Group instructions also include dimensions for the mold, but if you need dimensions,  I have some on my homeschool site here (not sure if this was the same as group's).     They are pretty simple to make, just four short pieces of wood nailed or glued together like in the picture above (ours were a little narrow--slightly wider ones are easier to work with).   You will also want to reserve  some thick short slabs of wood to use to help kids pack the mud and push the bricks out of the mold (see below).


A butter knife can be useful to run along the side of the brick mold if the brick has trouble coming out of the mold.  Below a child uses a plastic knife to smooth his brick.

The bricks shown here were made with a mix of 
garden sand/soil mixed in, and came out kind of
crumbly.  "Texas clay" straight out of my back yard 
worked much better - it dried solid like rock.


LOCATION AND MESS PREP
This "craft" is messy!  If you can, put your brick making area outside...doing this craft on hard ground or cement is preferable.   If the only outdoor location has grass, you may need boards, cookie sheets, or other flat hard surfaces to put your bricks on.  If picnic tables are available they work well...but remember to cover them with a plastic tarp or disposable tablecloth.  

If you have to do this indoors (as we did), protect your floor with a large tarp and line the outsides of the area with towels for kids to wipe their feet off on.  Also, have some extra towels and a bucket of clean water for kids to wash their hands in...maybe some hand sanitizer or soap too  (Historical Tidbit: Egyptians actually had a form of soap).    Also, be forewarned that your clothes will get muddy...it will add to the authenticity of your costume (*wink*).   We offered kids pillowcase tunics to wear during VBS, which worked to protect their clothes from home too.  If you don't do this, I would suggest providing some sort of apron or overshirt for kids to wear during this craft. 

 My outfit during the week got 
more and more "authentic"


DECOR
At our VBS, "shopkeepers" were in charge of decorating their area.  Decor for the brick making shop is pretty simple.   The bricks themselves can be part of your decorations...as the week progresses the kids will need to leave the bricks to dry, though having a few to show to start with is helpful.    Hey bales can be used as seats.  For covering your table and any decorative draping on the sides of the tent I suggest beige plastic shower curtains.  Only use sheets if you own them, not ones you've borrowed as they could get mud splattered on them.   I managed to find one real wooden bucket at a thrift store for ours, but we had plastic ones too...you could paint plastic buckets like wood but I don't think it would be worth the trouble, personally (cause you'll need a lot of buckets for this).   If you are outside you can keep dirt in piles.  Hay looks nice in burlap sacks or canvas laundry bags (but again, the messiness factor is something to consider...only do this with donated bags, not loaned).


7.  Dry your bricks on trays of hay or sand to keep them from sticking.  You will need to take them outside every day to dry in the sun, so kids will have to leave them (pray for no rain!). 

8.  An idea we toyed with but didn't use was making something with our bricks--like a firepit or an edging to a flower garden.  Didn't do that, but I still think this would be cool (depending on the sturdiness of your bricks).

Child playing with the muddy water
we used to mix our bricks.

MISC TIPS
  • Younger kids may come back to play in the dirt and mud.  Our brick-making shop turned into an "extra activity" for wee ones who finished early in other shops.


Most of these photos were not taken by me, but other wonderful photographers at Dayspring Baptist Church. 


Shared on Littles Learning Link-up and Dear Homeschooler Bookshelf and Throwback Thursday

Tuesday, December 30, 2014

Joseph, the Carpenter


Nazareth Village Carpenter - Photo by Andrew Dowsett
The greek word translated “carpenter” used to describe Joseph in our Bible was a very broad term that could also be translated “building-tradesman.” It could describe someone who worked with wood, stone, plaster, or tin and could even be used to describe an unskilled building worker.

One common job a carpenter did was to make planks of wood for a roof. The carpenter had to first cut down trees for timber with an axe or primitive saw, then either saw down the length of the wood or shape the wood into suitable beams with a hand adze (an axe-like tool used primarily for shaping wood). (You can see some pictures of first century carpentry tools here. )

Carpenters also made smaller items for the home like doors, window lattices, stools, low tables, and chests. In Nazareth Joseph most likely supplied farmers with agricultural tools like yokes, ploughs, and shovels. But it’s unlikely he would have found enough work in Nazareth alone, and probably often traveled to nearby towns to work on building projects or sell his craftwork.


PRINTABLE: : This coloring page by Bible Printables features various trees that grew in Isreal. These are examples of the trees Joseph may have used for wood for his carpentry.
PRINTABLE: : A coloring page of an Olive Tree, another tree that Joseph might have used wood from.

SOURCES
The Biblical Wood Shop
Isreal Pages: Sepphoris and Nazareth
Photo by Andrew Dowsett

CRAFT IDEA: Making Thread, Dyeing, and Weaving

This is part of my series on 1st Century Nazareth.
This page contains some affiliate links through which I can earn commission. 


Weaver from Nazareth Villiage  - Picture By See the Holy Land
The picture to the right shows a woman spinning thread like a woman in 1st Century Isreal might have done. They would start by making yarn using a drop spindle, then might dye the yarn, and then weave it on a loom. All of these activities make great crafts, though some of them are not as easy for young children.

MAKING THREAD ON A DROP SPINDLE
I have not tried this out but it looks as if this is a craft which could be done with older children and teens, but might be too hard for younger children. A drop spindle can be made from a dowel and a door pull, wooden car wheel, or even a an old CD. There is a good video showing how to use a drop spindle here, and you can find some detailed written instructions here (though it looks like two different types of spindles were used, one with a weight at the bottom and another with a weight at the top). Making enough string for even the coaster sized weaving project below would probably be too time consuming for a typical VBS marketplace session or Sunday School class, but it looks like making enough for three strands for a braided bracelet might be possible.

DYEING
While it’s possible to dye with the same natural materials used in the first century, most methods require boiling and some considerable time.  So, if you want to dye wool or cloth with large groups of children children commercial dyes may be preferable (though you can use grape juice or kool-aid).   Solar dying is an another option that doesn't involve boiling water but can take a week or more of the jars sitting in the sun (though kids can take their jar home to leave in the sun...you just need a lot of jars).   


Click on the links below to find out how to make various dyes which might have been used in first century Galilee:

Overview of Dying With List of Natural Materials You Can Use
(not all materials listed were available in 1st Century Isreal...however, the main mordant used with these, alum, was availible since ancient times). 

Plants Used in Dying (Includes historial info on some plants)
(Page sometimes refers you to Medical Uses of Plants and other sections of its site, which can be found from its main page here.)

Chicory and Walnut Dye
(Also has a Goldenrod Dye, which is Native to the Americas and wasn’t in Isreal at that time.  But chicory and walnut were both available in Isreal).

Dandelion Root Dye

Grape Juice Dye

Other Fruit Dyes

Marigold/ Calendula Dye

Onion Skin Dye

Pomegranate Dye


Picture of weaver from Nazareth Villiage provided by See the Holy Land.

WEAVING
Making coaster sized rugs or woven bracelets with cardboard looms is a craft children can do, and which many adults would enjoy as well. You can find a tutorial here or check out the video below.  You can make the looms yourself from scrap pieces of cardboard, though if you are doing these with a large group it might be worth it to buy them (you can find a variety of sizes for sale here and some wide-notched varieties that work well for kids here). To make it easy for children to weave, you can glue popsicle sticks to the end of pre-cut pieces of yarn for them to use as a “needle” to pull the thread over and under the strings, or you can purchase plastic needles. Unfinished projects can be taken home, but make sure to first demonstrate what to do when finished (and possibly send home printed instructions). Another option is a straw loom which is sometimes easier for little hands.


The picture above is the weaving craft we did for VBS (in process of course...it often took kids more than the 20-30 minutes we had to finish this one, though some older kids did).  We purchased notched cardboard looms from Dick Blick.  As you can see, the kids pulled these a little tight (in one case EXTREMELY tight), so that's something to talk to kids about before you do this, and watch for so their weaving is of uniform size.  We stuck balls of yarn the children had chosen to use next in the loom to save it for later.  It can be helpful to pre-cut several small balls of yarn so kids can just grab them and go.


HOW TO WEAVE ON A CARDBOARD LOOM


This video covers all the basics. I will note that I've never done the step they show where you weave the loose ends on the side back through...usually I just cut those off, and sometimes I even end those in the middle of the row, and I've never had a problem with it. If I were to do that technique, I think I would try to end some of my rows on the other side so that both sides had a little extra thickness, not just the one side. But with kids, I think just having them cut it off is simpler. 


HANGING LOOM (Group Project)


At our VBS we had a large hanging loom which kids could try out.   It consisted of two poles of equal length, attached by thick twine (needs to be thick to hold the weight of both sticks and the finished project.)...the whole thing was hung on the tent.  I wasn't the one who constructed it, and I wish I had paid a little more attention.  While obviously it is tied at both ends, I remember she looped the twin over both sides first before tying and I think this was to make sure the length of the twine was even when tied.   

We used mostly strips of old t-shirts  to weave with, and a few plastic bags too (though I think for authenticity I might have left those out if doing this again, though they do make an interesting texture.). 

Here's how the loom looked in our "marketplace shop."  


Activity: A Galilean Garden


(NOTE:  This was originally an activitiy primarily for Nazareth VBS, but to my knowledge these grow throughout Galilee, or at least in the mountains of Galilee, so I changed it to Galilee for wider use).


"Observe how the lilies of the field grow; they do not toil nor do they spin,  yet I say to you that not even Solomon in all his glory clothed himself like one of these.  But if God so clothes the grass of the field, which is alive today and tomorrow is thrown into the furnace, will He not much more clothe you?"
Matthew 6: 29b - 30a
 
Planting something which grew in Galilee can be a fun activity to connect kids with Bible stories, especially since Jesus mentioned the plants that grew and were cultivated there so often in his parables and teachings.  There are common garden plants you can find at most garden shops which are similar to varieties that grew wild in the Galilean hills (or which were cultivated in 1st century gardens).  I’ve listed some below which have short germination times (which is important when planting with children, who can loose interest if a plant takes too long to sprout).  The varieties which grew wild in Galilee then were, in many cases, a little different then the modern varieties grown in the US...but it's still a fun connection to make.
 

FLOWERS
Alyssum, (germinates 4-8 days) – type in Isreal is yellow
Aster (germinates 7 – 14 days)
Calendula/Pot Marigold (germinates 5-7 days) .
Pink Dianthus (germinates 5-7 days)
Morning Glory (germinates 7 – 14 days)
- NOTE: the seeds of morning glory are poisonous if eaten in large quantities.
Portulaca (one site said 6-10 day, another said 14 – 21 days)
Scabiosa/Pincusion Flower/Bachelor Button – (germinates 8 – 12 Days)
Snapdragons (germinates 7 – 12 days)
Viola (germinates 7 – 14 days)


FUN FACT: Calendula flower was used for medicine, and a dye can be made using it’s petals. The type which grows in Isreal looks more like a daisy and less like a mum (I’ve seen something similar sold in garden centers in the US).


VEGETABLES and HERBS
Cucumber (germinate 4-6 days)
Squash (germinates 4-6 days)
Canteloupe/Muskmellon (germinates 4-6 days)
Garlic (plant cloves)
Dill (germinates 5 days)

Since none of these vegetables grow well on a windowsill (except possibly garlic or dill, though dill grows tall), you may want to check here to see when is the best time to plant in your area. Cantaloupe may be an issue with parents, since they take up a lot of garden space.


READ MORE:

FARMING TOOLS PRINTABLE: You can share this free coloring page from Bible Printables featuring farming tools from Bible times to teach children even more about farming.

THRESHER PRINTABLE. This coloring pages features a thresher used to thresh wheat in ancient times.


Wednesday, May 29, 2013

Roman Social Structure in the 1st Century


Roman Families
You can't talk about social structure in Rome without talking about the Roman family.  Legally, in Rome, people were not treated as individuals, but as family groups.  The paterfamilias (the oldest male member of the family--father or grandfather), controlled all the assets of all of the family, even of grown sons and grandsons (male heirs).   He could choose whether each child born in the family was kept or abandoned to die.  He was held responsible if one of the members of his family committed a crime. When the paterfamilias died, men who lived in their own households at the time of the pater's death became the paterfamilias of those households.

Women had a choice when they married to remain financially under their “pater” or transfer control to their husband.  Most choose the former, since it gave them some financial freedom from their spouse, and a chance of a future inheritance of their own.  Even so, Roman law required that a women have a male guardian of some sort until she had born three children (four for freedwomen).  During the  empire women could replace their guardians at will.

Social Class in Rome
Roman social class was written into Roman Law, and affected all areas of life.  Your social class defined everything from who you could marry,  where you sat at a theater, and what quality of food and wine you might be served at a dinner party.

Senatorial Class
Though the 900 members of the senate were the most powerful class under the Emperor.  Membership in the Senate was generally limited to those those with a pedigree of distinguished ancestors and considerable wealth (one million sesterces to be exact).  Senators were prohibited from engaging personally in non-agricultural business, trade or public contracts.  They wore a white toga with a dark purple trim.

Equestrian Class
Those who could claim two generations of free birth and possessed 400,000 sesterces could become an Equestrian (and Equestrians who fell short of that amount of wealth lost the status).  Unlike senators, Equestrians were allowed "unlimited participation in commerce, trading, and governmental contracts," though they often choose to rest on their wealth and land-holdings and not engage in business.

Common Citizens (Plebeians)
The common citizen class included both those who were quite well off to the poorest of the poor. Citizens were allowed to wear the white toga.

Freedmen
Some freed slaves received rights similar to those of citizens, while others were treated legally more like foreigners, depending the manner in which they were free.  There were ways for some slaves to receive full rights as citizens (such as serving 6 years at a Vigeles, or Roman Firefighter).  Freed slaves still had some obligations to their former masters.    Children born after they had been freed became full citizens.

Slaves
Between 25 to 40 percent of the Roman population were slaves, whose work ranged from hard labor, menial work,, work as skilled tradesman, and even managers and teachers.    Not all slave masters were servants of the upper class--many were employed by merchants in their businesses.  Private slaves had no rights, and their masters could subject them to whatever abuse they wanted (though treating your slaves cruelly was frowned on, so there was some social ramifications to abusing a slave even if there were no legal ones).  Slaves were also employed by the government both for public building projects and administrative work.  Some higher level government positions for educated slaves even included a salary, and some legal rights that private slaves didn’t have.

Foreigners
All other freeborn people who lived in Rome.  They had less rights and privileges than Roman Citizens.

Part of this post is available in pdf form.


My Sources for the Roman Families
http://en.wikipedia.org/wiki/Pater_familias
http://when-in-rome.tumblr.com/

My Sources for the Roman Class System
http://www.vroma.org/~bmcmanus/socialclass.html
http://maxwellinstitute.byu.edu/publications/books/?bookid=46&chapid=250
http://www.bbc.co.uk/history/ancient/romans/social_structure_01.shtml

And For Slavery Speicifically
http://vroma.org/~plautus/slaverysheridan.html
https://facultystaff.richmond.edu/~wstevens/history331texts/slavery.html
http://en.wikipedia.org/wiki/List_of_Roman_battles

Pictures from Vroma.org