Monday, February 6, 2017

How to Make Greco-Roman Columns

Dayspring Baptist Church, Waco, TX


Several years back for Vacation Bible School our church took our children on a trip through the 1st Century city of Rome where we learned about Paul and the Underground Church." In the process we created a lot of Greco-Roman Décor, and found a lot of inspiration both from groups who had done this program and the similarly decorated Athens Holy Land Adventure.

I wanted to pass on the great ideas we learned about for others who might be doing the same programs, a piece of Greek or Roman theater, or a wedding or party with this theme. You will find some creative and inexpensive decorating ideas below.

  
3 Dimensional Columns


Columns are essential to Greco-Roman décor, and three dimensional columns are, I think, the most stunning way to go.

Where to Buy 3D Columns
We invested in two large 12' cardboard columns (pictured above) and have used them over and over for different Holy Land VBS (not just Rome, but for Pharoah's palace in Egypt, and the Synagogue in Nazareth and Galilee).  Large columns like these can make for a very dramatic effect.  You can find similar ones at Stumps Party Supply.  For shorter columns you can find a nice selection at Oriental Traders for a good price, but be warned to leave lots of time for delivery (shorter columns are also not difficult to make, which of course is even cheaper...see below for various methods).  If you do not have a good place to store columns for use in future years, you may want to consider renting columns from a local wedding/event service.


Poster Board

Use Poster Board and Pizza Boxes
This one seems super simple and inexpensive! A pizza place might be willing to donate some clean, unused boxes (especially if you also bought lunch for volunteers there)!  You could use corregated cardboard for a ribbed texture and a little more support  (our columns for our intro picture were made like this, with foam "crests" in stead of pizza boxes. 


Make them With Cardboard Tubing
You can use carpet tubes (what  carpet comes rolled around) for thin columns.  Places which sell carpet are often happy to donate these.  For thicker columns you can buy construction tubes (also known as building tubes, cardboard concrete forms, and Sonotubes).  You can find these individually at home improvement stores,  but from what I've seen they only smaller ones (48" long or shorter).  There are several manufacturers that sell longer full column length ones, but generally only in bulk.  You could possibly contact a local construction company and see if they would sell or donate some in smaller quantities.


Use Building Tubes, Pots, and Plaster
Decorative Faux-Stone Column - Shorter but very realistic. I've seem people use plastic pots with molded edges for some very decorative molding...same idea though.

Use Building Tubes, Pool Noodles, and Foam Board
DIY Network shows you how to make faux stone columns...very realistic looking.  Pool noodles are a more pricey material, but if you can buy them out of season (at the end of summer, early fall clearance sales) they cost less.

Very Realistic, Structural Method With Tall Building Tubes
The blog Tootsie Time shows how she made permanent columns for her home. They are beautiful.


Use Textured Wallpaper to Add Ridges
Once you have a base (see above) you can use textured wallpaper to add ridges.  I got this idea from Jennifer Hosler.


She used Easy Textures Paintable Wallpaper (Pattern No 99424F) to cover a carpet tube column.   I didn't find that exact one but I found a similar style by another brand here.


"Warren" Method of Constructing Columns


Kate Taylor Warren and her husband shared the following method they came up with to make columns like you see above.

Inside each column is a 90" heavy cardboard carpet tube. Each has a 2-3 foot wooden fence post fit snugly inside and screwed to a 20" board as a horizontal base. The part of the column you see is five sheets of under-wallpaper insulation cut in lengths that circle around to make a 20" diameter cylinder. A construction stapler was used to staple them to the carpet tube in the back.

The material they use,  found in a DIY store where wallpaper is sold, consists of a very thin layer of polystyrene bonded to a layer of heavy brown paper. It pops out easily to hold its shape when circled and stapled, and is easy to paint. Kate Warren and her husband are in England, so I'm not sure whether the same material is available here in the States, but it would be worth checking into.

They measured the "stripes" on the individual sheets and marked them so they could be painted before assembly on the carpet tube. This was an easier and safer way to paint--no climbing ladders and trying to get straight lines painted.


The columns are set on squares of stryofoam (called polystyrene in the UK). The cornice (or pediment) is not resting on the columns but is suspended from the ceiling. Otherwise it would be rather unstable.


Pool Noodle Columns

 Elizabeth Ann Seton Catholic Church in Houston, TX
Photo by Marian Seidel

You can find full step by step instructions on how to make pool noodle columns here also (though it was for a more permanent feature, so had some steps you could skip for VBS).   Here's some in-process pics shared by Marian Seidel of Elizabeth Ann Seton Catholic Church in Houston, TX.  (She's still in the in process phase so I don't have final pics right now).


1.  You start with cardboard carpet roll tubes for a base.

2.  Cute pool noodles in half lengthwise with exacto knife (to make two parts like celery sticks, not two shorter pool noodles).

3.  Put foam into noodle like you would put cheese whiz on the celery stick, and press onto roll.

4.  Use 3 nails, one at the bottom, top and middle to secure.

5.  Trim as necessary. (Save pieces...see #6)

6.  Make a stand (sorry, I don't have instructions on how to make stands, but you can see some examples there.  I believe there is a stick or  in the middle that you just drop the carpet tubes onto).  Use extra pool noodle pieces and/or foam to stuff into carpet tubes to stabilize.

7.  Paint


TIP:  If you're planning this long in advace you can save money if you buy pool noodles out of season (at the end of summer, early fall clearance sales).


Corrugated Plastic Columns


You can use sheets of corrugated plastic (PVC Roofing) either to make freestanding columns, or to wrap around posts and other features.   While pricey, this method has the benefit of being weather resistant, so is great for outdoor features.  You can find this type of sheeting at most hardware stores.

You can see one of these types of columns in the background of picture to the right. Thanks to Rebecca Edwards for this picture.


Dayspring Baptist Church, Waco, TX


Another church used these to make the following....


Photo and instructions by Ruthann LaMoreaux Litchford‎


HOW TO MAKE COLUMNS/PEDIMENT
The pediment is the triangular roof on top

MATERIALS
12 ft white pvc roofing panel (corrugated plastic), cut in half to 6 feet; 
Heavy duty scissors or snips
(1) 4x8x2 foam insulation board, white
(1) liquid nails tube (& caulk gun)
(1) roll white duct tape
(1) bread knife or box cutter
(4) Wooden Chop Sticks

TO MAKE COLUMNS
1.  Cut panel into (2) 6ft pieces using heavy duty scissor or snips and duct tape into tubes. 

2.  Score and snap insulation board into squares for column bases - for each base I cut (1)13x13" & (1)11x11" & (2)6" circles.  Use liquid nails to adhere these into a stack. 


3.  Once dry assemble column onto one base and slide a second base on top.  


4. Using remainder of insulation board score & snap a large triangle along with enough framing to surround it. (The one pictured used 6ft wide base x 2 ft high triangle. Bottom framing board was 11" wide to sit securely on column topper. Side framing pieces were 5 or 6" wide.) 
5.  Miter the corner edges with a knife/cutter. Liquid glue it all together. Dry 24 hours. 
6.  Use a poster or any signage you want to fill in the center. 
7.  Place pediment onto columns and push chop sticks through into column base for attaching. Score, snap, glue, chop stick. Done.


TIP:  How to Create Depth

If you are making a colonnade on a stage you can create depth and and add an illusion of a larger scene by starting with taller columns and then using descending smaller columns, set at an angle like the picture on the right... continuing the colonnade with a backdrop with painted columns at the back.

In the following picture you can see the angling technique (though I don't know whether their columns decended in size). 


(I got this idea and the drawing in this section from cdevries, who writes a number of wonderful articles on theater design. It was from a section on 3 More Ways to Improve Your Theater Set about creating depth. The picture above is from Faith Baptist Church. Used with permission.)


2D Colums


Picture by Mindy Love Harper


Flat paper columns are simple and inexpensive. You can draw them on butcher paper or posterboard (for thicker, more reusable affect) or order pre-made ones online.

I love how Trinity Presbyterian Church of McKinney, Texas used simple paper columns and a roof to frame the doorway to "Paul's House." While it takes a little drawing skill, it doesn't look unreasonably hard, and yet is very effective in transforming this from just another room to a house in Athens.

And, if you prefer to avoid drawing/painting it yourself, here are several paper column options I found online (click pictures to find on Amazon)...


Semi-3D Columns

For a semi-three dimensional look try one of the techniques below.


Foam Board Columns


Dayspring Baptist Church, Waco, TX

We carved foam board with a hot knife and painted the indentations grey to make these columns. Then we put them up in front of some pretty party paper to cover up a wall sculpture you see peeking out of the top there. I believe the paper we used was flat, but the only paper with the same design I was able to find now online was this corrugated version (which is probably more expensive than what we used, but would offer more stability).

Cardboard Column "House"


Photo by Michelle Robeson La Flamme

This structure was made out of a VERY LARGE box. It has plaster on it which gives it the column texture.  I like that a person could actually get IN this columned house.


See More Rome VBS Posts


This post includes a few Amazon affiliate links through

which I can earn a commission.  Anything earned through

this post will be donated to charity.   More info here.


Wednesday, January 18, 2017

What To Do With Stacked Chairs

We have a bunch of chairs we usually stack in the corners of our marketplace during VBS, just to get them out of the way.   When we did Rome we found a creative way to hide the stacked chairs under sheets, turning them into scenery.   (You can often get donations of old white sheets from hotels).


When we had an Egypt themed VBS, we found another way to use our "chairs."   We made "houses" out of them, and used these for our "Tribe Time" (which I believe was called "Family Group Time" that year). 


I liked how a colored piece of cloth looked like a lintel over the doorway (pictured above). A tribe sign also decorated each house.


Inside we made less effort to cover up the chairs (ran out of sheets).  We decorated with blankets and pillows for the kids to sit on, and various other knick knacks our tribe leaders brought.   Each tribe got a camp-fire for their room...something left over from the previous Wilderness VBS.


While they didn't look perfectly like houses, the outside was still a lot nicer to look at than stacked chairs.   


You can see two of our rooms in the corner of this picture...they looked nice with the marketplace tents.  We had four in total, one in each corner.   Having these rooms right in the marketplace made for less traveling (there was also two Sunday school rooms used, right outside our marketplace...but we didn't have to use rooms in our other building, which is a further walk). 

Saturday, November 5, 2016

Egyptian Writing Activity

There's something interesting that you won't find in most kids books on Egypt ...that there were TWO types of writing used in in Egypt.

 Hieroglyphs


Hieroglyphics is the type of writing most people associate with Ancient Egypt.  It featured characters that looked like pictures, and could stand for either sounds or the objects depicted (depending on context).

BUT, it was not the only type of writing being used in Egypt at this time....and not even the most common type.


Hieratic Writing
(and a few hieroglyphs too)


Picture by Nic McPhee - From British Museum - Adapted Under Creative Commons

Most Egyptians used a form of writing known as hieratic.   It derived from hieroglyphics but was used alongside it  (sort of like we have printing and cursive).   Over time the two forms of writing began to have different functions.    While priests and monument carvers still used hieroglyphics to record things of religious and historical importance, merchants and traders and everyone else used hieratic to write their grocery lists, records, and love notes.

You can see in the examples of both hieratic and hieroglyphics in the ancient religious text shown above (hieratics make up the main body of the text written under the scene at the top, but in the top right corner above the seated women you can see hieroglyphs). 

Documents like these would usually be written on papyrus, a type of woven paper, or sometimes on animal skins--both of which were time consuming to make and therefor expensive.   But the common people, the laborers and farmers and traders, if they could write wrote their hieratic notes on flat limestone rocks, and broken bits of pottery, which were cheap and readily available. 


 Egyptian Writing 
and Scribes Pallet Craft

Kids learning to be scribes in Egypt would practice writing on flat rocks and broken pottery ...it is just as "historical" as writing on papyrus.  So, for this activity I gathered up smooth rocks at a local garden center, and also broke up an old terra cotta pot.  I explained a little bit about the history of both styles of Egyptian writing and game them some sample alphabets of both.   I had them choose a terra cotta shard, or a rock, to paint hieroglyphs and hieratic on with red and black paint (the most commonly used ink colors in ancient Egypt).


I also made reed "brushes" and scribe pallets (a craft I found in Make It Work: Ancient Egypt) for the kids to use.   You could have older kids make these themselves, but the craft does involve using an sharp knife.  Alternatively you could pre-cut the pieces and have kids glue them together and make the indentations for the ink themselves. 


HIEROGLYPHS AND SCRIBES PALLET CRAFT

SUPPLIES:

For Stone Painting
  • Red and Black Paint (goes in Pallet if you make that)
  • Flat-ish stones and/or a terra-cotta pot (and hammer + trash bag or safety glasses) 
For Scribe's Pallet:
  • Balsa wood strips (find at hobby store)
  • Harder wood strips for base (optional...see note in instructions)
  • Wood Glue 
  • Round object (see step 8)
  • Cardboard to cut on (a cereal box folded flat works well)
  • Utility Knife


For Reed "Brushes":
  • Any old reed-like weedy grass
  • Scissors

Guide for Writing Hieroglyphs and Hieratics
Egyptian Alphabet Comparison Sheet


INSTRUCTIONS

1.  Collect stones or break a terra-cotta pot.  It's a toss up which is better to use.  The terra cotta is smoother and easier to paint on, but has jagged edges  (though not as sharp as glass). Many garden centers have stones you can buy, or will not mind you taking smaller broken pieces from larger flat stones they sell.  But if you choose to break a terra cotta pot with a hammer in stead, wear safety glasses OR put the pot in the plastic trash bag before breaking to keep broken bits from flying up.  Make sure to sweep area thoroughly afterwards.  (Fun alternative if you have a second story:  clear all people from the area and toss the pot from a 2nd story window.  You can tell I enjoy destruction...just a bit).

2.  For the pallet, I liked using Balsa wood strips for the top part, but a harder wood strip in the same size for the back, to add strength.  Because I was making several of these it was actually cheaper to do this (the harder wood cost less than balsa), but if you were making just one it would cost less to cut one strip of balsa in two and use it for both top and bottom. I found my pre-cut wood strips at Hobby Lobby.

4.  Cut the bottom and top strips to exactly the same length (8 - 10 inches). 

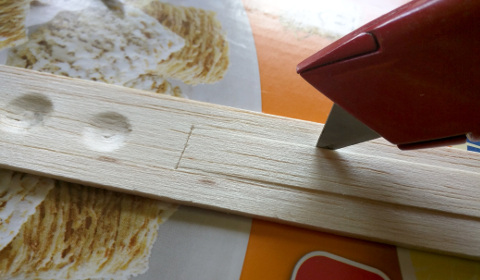
5.  The original craft called for cutting out the ink wells with a craft knife, but I thought it would be easier to press them in the soft balsa wood in stead (you can see how this turned out in the pictures).  It does make for a shallower bowl, so if you want to cut them out with a knife for a deeper ink well, do so during this step.   Otherwise, I think it would probably avoid some of the warping I got later to press them after gluing (though I have not tried this)   For the area to hold your reeds cut a rectangular strip from near the bottom of the top later of balsa wood...leaving about two inches at the top for your inkwells, as shown below.


7.  Glue your top balsa piece to your bottom wood piece...put a book on top to press them pieces together while they dry. 

8. To press out your inkwells (if you haven't choosen to cut them in step five), find a hard object with a small rounded surface.  I used the handle of a small hammer.  You could also use a screwdriver handle or even a marble.  Press the rounded object into the balsa wood hard until it makes an indentation.  (The example below shows only one layer because I made the mistake of pressing before gluing the top and bottom layers).


This is one step that even a young child can help with.  Wha-la...your scribe's pallet is done...now it need some reeds to fill it.


9.  Go outside and look for some weedy grass...something long and skinny, not wide and flat.  Cut off any "seed heads" and cut into segments just shorter than your reed holder.


10.  Last, put a drop of red and black ink in your pallet inkwells, grab your rocks or terra cotta pieces, and start painting hieroglyphics and hieratics (this page can be used for a reference)!


Saturday, October 22, 2016

Ancient Egyptian Foods


Below are all types of food that the ancient Egyptians had that I could dig up.  Originally this was a list I made for a living history Vacation Bible School, but this list could be used for all sorts of other purposes.

I started out trying to limit this to the foods that would have been available in Egypt in the time of Joseph and Moses, but when these event occurred is highly debated among Biblical scholars and so really hard to nail down.   Also, sometimes I don't know when exactly a certain food/ingredient was used in Egypt, just that it was used at some point. 

NOTE ABOUT DATES:  We don't have definite dates for when Joseph and Moses lived, but since the story of Moses mentions chariots, which were not in Egypt until they were taken over by the Hyksos (in the 2nd Intermediate Period between the Middle and New Kingdom), we can limit it to, at earliest, Late Middle Kingdom, or some time after that, but most likely before 1000 BCE.   


FOR VBS VOLUNTEERS:  I've  included some things for historical interest that would not be feasible to use during VBS (don’t worry, I’m not suggesting serving wine or beer, or trying to hunt down papyrus root, which besides being hard to find is now endangered).  


RECIPES

Egyptian Bread and Tigernut Cone Sweets
This is similar to the other tigernut recipes below, but they model the Egyptian method of making them, based off of depictions in Egyptian murals, not just the recipe.

"Tigernut" Sweets   (Includes Walnuts - introduced in Greco-Roman Times)
"Tigernut" Sweets II  (Includes Walnuts - introduced in Greco-Roman Times)

Horchata With Actual Tigernuts  
This also includes a recipe for beer in the beginning.   The Horchata recipe is down below.  Tigernuts are sold now as a health food in some stores so it might be possible to get them to make this recipe. 

Tigernut Honey Cakes

Egyptian Palace Cake 

Egyptian Marshmallow   
While no recipe for this exists, we know they had marshmallow plant and used it.  This is a possible recipe made with ingredients they would have had.   This is not modern marshmallows.

White Lotus Cakes   
Calls for actual lotus seeds, so this one might be harder to find, but would be a cool treat if you could find them. 

Egyptian Bread (Modern Adaption - with historical info) 
Very simple bread recipe. Article includes some other ancient recipes. 

Egyptian Beer Bread (made like Egyptians made it)
Scroll to the end to find recipe.   Beer bakes out.  Lots of good info on Egyptian baking above.

How to Eat Like and Egyptian Pyramid Builder
This includes several simple recipes that were probably eaten by the workers on the pyramids:  flat bread, lentil soup, salted tilapia, and stewed lamb.

Ta'amia/Falafel (Bean Cakes)
While its origins are disputed, some claim this dates back to the pharonic era of ancient Egypt.   Falafel today is usually made from chickpeas but in ancient Egypt it would have been made from beans.

Tilapia Soup

Watermelon Seed Recipe
I read that Egyptians originally cultivated watermelons for their seeds, not to eat the flesh--an indication that early on they weren’t sweet like today, though around the time of Joseph it seems they may have cultivated a more palatable, if not totally sweet, variety.  While we don’t know for certain how they ate the seeds, I found this simple recipe which seems like something they might have done (it’s a middle Eastern recipe with ingredients they had then).  You de-seed watermelon served as a snack, and then later use the seeds to make this.  (Another version here doesn't mention drying seeds as long)

Dukkah Spice Blend
Ancient spice mixture that can be used to season meat, mixed with hummus, or used as a dip for bread.  (Scroll Down on Page for Recipe)

Pickles
The Egyptians made pickles by soaking cucumbers in vinegar, and mixing in spices to flavor them (kids could have fun making their own pickles with combinations of spices Egyptians had, listed further down on this page.)  (11)

Goose with Pomegranate Sauce - Not a dish we knew they made, but a dish with foods we knew they had and ate, so a possible recipe for sure. 

A Meal With Cleopatra
This contains four recipes.   The bread would have been something available at all times in Ancient Egypt.  The rest were intentionally supposed to represent the foods that would have been available at the time of Cleopatra, long after the Greeks had taken over Egypt, and when Rome had taken over what we now think of as Greece...so these recipes have Greek and Roman touches.   While the Greek and Roman influences on Egypt came long after Joseph would have been in Egypt, I think the Mersu with pistachio would be an interesting choice for the time of Joseph, since the Bible records that Joseph's brothers brought him gifts of pistachios (not a native Egyptian plant) on their second trip to Egypt (Gen 43:11), and this is a way that they could have been used in Egyptian cuisine. 


WHAT INGREDIENTS/FOODS THEY HAD

You can use the ingredients below to find food for snacking or imagine other recipes they could have made. Remember that while they had a wide variety of foods available, they couldn't use them all at once because some things would only be available in certain seasons (you can find more info on seasonality at the bottom of this page).


BREADS AND GRAIN

  • Bread (a main staple of the Egyptian Diet)
    • They used emmer wheat (Triticum dicoccum) and six-row barley (Hordeum vulgare subsp. Hexastichum) (1)
    • Bread was made from flour ground on grinding stones and mixed with water that was then kneaded and left to rise. The dough could be shaped in a flat loaf or baked in ceramic molds. (1)
Egyptians had trouble keeping sand out of their bread...we know this because of the way the bread they ate wore down their teeth.  (12)

DRINKS (5)
  • Milk (from sheep, goat and cow)
  • Water
  • Beer (a main staple of diet)
  • Wine (mostly from grapes, but also from pomegranate, grapes, and other fruit)
  • Juices

MEAT (1)
  • Cattle
  • Chicken - used after Persian times, uncertain before that
  • Duck
  • Fish - primary source of meat for most Egyptians (included Nile perch, catfish, and mullets)
  • Geese
  • Goats
  • Pigs
  • Sheep
  • Wild animals were hunted, mainly from the desert, and included wild cattle, addax, antelope, hartebeest, gazelle, ibex, Barbary sheep, oryx, and ostriches.  Wild birds were also hunted.  Hippo and crocodile were hunted mainly because they were dangerous. "In pharaonic times many of these desert fauna were hunted for sport by royalty and nobles; hunting dogs similar to the greyhound were used for this." (1)

DAIRY PRODUCTS (5,6)
  • Eggs
  • Cheeses
  • Yogurt
  • Butter (clarified, resembling oil...probably because of the heat).

VEGETABLES (1)
  • Carob (Introduced in Middle Kingdom, used as a sweetener)
  • Celery - Introduced during the 18th Dynasty (early New Kingdom), eaten raw, and used to flavor stews. (9)
  • Cucumber (introduced in New Kingdom) (9)
  • Chickpeas (introduced in New Kingdom, 18th Dynasty) (9)
  • Cress (seeds used as flavoring, so possible that plant used like lettuce as well)(9)
  • Garlic
  • Fava Beans
  • Lima Beans
  • Leek
  • Lentils
  • Lettuce - Its leaves were eaten whole, dipped in oil and salt (4)
  • Lotus Tuber (Arum colocasia)
  • Mallow (4)
  • Onions
  • Peas
  • Papyrus Tuber -”...they pull up from the fens the papyrus which grows every  year, and the upper parts of it they cut off and turn to other uses,  but that which is left below for about a cubit in length they eat or  sell: and those who desire to have the papyrus at its very best bake it  in an oven heated red-hot, and then eat it.”  Herodotus, Histories II, 2.92  (4) -
  • Raddish - white/pink (introduced in Middle Kingdom, 12th Dynasty)(9)
  • Tigernut (a root crop, not actually a nut - sometimes sold now as a health food ) (3)


FRUITS (1)
  • Carob Trees - More common in new kingdom (1)
  • Dates and Date Palm
- Imported plant...not sure when imported. (1)
- Plentiful after hand pollination was practiced...not sure when that was
  • Dom/Doum Palm (native plant with brown fruit) (1)
  • Figs (common fig and sycomore fig)
  • Grapes and Raisins
  • Olives (rare) -there’s evidence of olives, though olive trees don't grow well in the southern part of the country - olive oil was a luxury item so probably olives were too.    (1)
  • Persea
  • Pomegranate - more common in New Kingdom, though still a luxury item (9)
  • Watermelon (2)  - probably was not as sweet as watermelon today.
  • Black Mulberry (introduced in New Kingdom)
  • Wild Zizyphus berries
  • Apricot (imported, only used by wealthy) 
  •  
     
NUTS/SEEDS
  • Sesame
  • Watermelon Seeds
  • Lotus Seeds
  • Celery Seeds (introduced in early New Kingdom,  incorporated in sauces for grilled fish) (9)
  • Almonds (New Kingdom on, rare, imported from Persia and Armenia) (5)
  • Pistacio (not native - it was available but rare, imported) (14-16)
  • Various other seeds
The Bible tells how, when Joseph's brothers returned to Egypt the second time, their father told them to "Put some of the best products of the land in your bags and take them down to the man as a gift—a little balm and a little honey, some spices and myrrh, some pistachio nuts and almonds." (Gen 43:11)   These would have been valued, because myrrh, pistachio and almonds did not grow in Egypt (14-16). 


HERBS, SPICES (1)
  • Anise (added to bread, flavored pork)(9)
  • Celery Seeds
  • Cinnamon (imported and only available to very rich, sometimes even used in mummification) (10)
  • Coriander (available from the New Kingdom onward, added to bread, seasoned fish) 
  • Cress Seeds
  • Cumin (available from the New Kingdom on, used on flavored bread and fish)(9)*
  • Dill (available from the New Kingdom on) (9)
  • Fennel
  • Fenugreek - was used as a spice and possibly after the seeds were removed the stems provided fodder for livestock.
  • Garlic
  • Lavender
  • Majoram (9) 
  • Mustar (possibly as early as Middle Kingdom) (9)
  • Parsley (9)
  • Rosemary (9)
  • Thyme (9)
  • Salt

*Cumin was associated with faithfulness, and so soldiers and merchants sometimes carried the seeds in their pockets to remind them of those waiting at home.   They also thought cumin could help digestion and settle the stomach. (10)


OTHER
  • Olive Oil - an imported item common after the Hyksos (9)
  • Seed and Nut Oils
  • Celery Seed Oil (used as a food preservative in New Kingdom)(9)
  • Other Oils
  • Vinegar (8)
  • Honey - produced in ceramic hives (1)
Honey was the primary sweetener, gathered with effort and used sparingly. It was associated with the gods, with preservation, and with ritual purity. Most Egyptians would have encountered honey only on special occasions.  (Donnie Dodson, Eats History)


SOURCES
1.  http://astromic.blogspot.com/2012/01/food-in-ancient-egypt.html

2.  http://news.nationalgeographic.com/2015/08/150821-watermelon-fruit-history-agriculture/

3.  https://en.wikipedia.org/wiki/Cyperus_esculentus

4. http://www.reshafim.org.il/ad/egypt/timelines/topics/vegetables.htm

5. http://www.reshafim.org.il/ad/egypt/timelines/topics/drink.htm

6. http://www.reshafim.org.il/ad/egypt/timelines/topics/meat.htm

7. https://books.google.com/books?id=Vj7A9jJrZP0C&pg=PA632&lpg=PA632&dq=celery+egypt&source=bl&ots=zt20tgyJKt&sig=PQaNQatoZHYbNAP6AG5BTmFmCqE&hl=en&sa=X&ved=0ahUKEwiD58uW-orNAhUE7IMKHc31CvcQ6AEIQzAJ#v=onepage&q=plum&f=false

8. http://www.ancient-egypt-online.com/ancient-egyptian-food.html 

9. https://cowofgold.wikispaces.com/Ancient+Egyptian+Food

10. https://www.history.com/news/spices-of-life-in-ancient-egypt 

11. https://www.teacherspayteachers.com/Product/Ancient-Egypt-Reading-Comprehension-The-Nile-River-2613230

12. http://www.ethanholman.com/history/egypt/dailylife/breadmaking.htm

13. https://sourdoughstartersfall20.wordpress.ncsu.edu/2020/09/11/the-history-of-the-cucumber/

14. https://en.wikipedia.org/wiki/Pistachio

15. https://www.pisti.it/en/pistachio-origins-and-varieties-in-the-world/

16. https://crewsproject.wordpress.com/2018/02/16/crews-display-pistachio-potsherd/


LINKING UP AT....

Throwback Thursday

Wednesday, July 6, 2016

Temple Mound Sifting Project

A fascinating video about the Temple Mound Sifting Project, with many pictures of archaeological finds and pictures and videos of the Temple Mound in Jerusalem.  (Note:  Contains call for donations at the end).


Monday, June 13, 2016

History Round-Up

These aren't necessarily new articles and resources, but new to me, and interesting! 


EGYPT

Egyptian Tour - Daily Life
A blog post with LOTS of pictures and a focus on daily life in Egypt.

Pharoah in Canaan
This article is about an exhibit that explores the cross-cultural exchange that took place between Egypt and Canaan during the second millennium BC.  Has a mention of the Biblical story of the Joseph, and lots of pictures.

Oldest/Longest Ancient Egyptian Leather Manuscript Found
Interesting tidbit about use of leather vs. Papyrus:  Parchment was used for important religious texts and for documents that had to travel, because it the short term it was more sturdy than papyrus.  But, over time it actually broke down quicker than papyrus.

Youngest Mummified Fetus Discovered
This is interesting because it says a lot about how Egyptians viewed the unborn.  The baby was probably from a miscarriage.

Amazing Mummies of King Tut's Grandparents

Redating the Exodus and Conquest (Free Book PDF)

Egyptian Boat Burial Discovered

Oldest Depiction of Ancient Egyptian Demons Found
"The ancient Egyptian world of belief was inhabited by a huge number of entities with super powers. They could play both malevolent or benevolent roles, as threats, maladies and dangers, or as protectors, helpers and defenders."

Art and Power in Ancient Egypt

Nilometer Discovered from 3rd Century BC
This instrument measured the Nile's rise and fall and was used for Taxes


ISREAL/JUDEA

Photo of the Week - Judean Desert

Daily Life in the Time of the Judges 

Ancient Sticy Notes Shift Secular Scholars Closer to Evangelicals on Bible's Age


OTHER/VARIOUS

Why No Truely Ancient Bible Writings Have Been Found
This article talks a lot about the history of writing in general, as it goes into deatail about the materials used by ancient writers including (but not limited) to Isreal, Egypt, Phonicia and how these hold up over time.

Free Books/Articles from Biblicalarchaeology.org
Well, I'm sure these have been there for a while, but I just discovered it:  a whole page full of e-books on Biblical history and archaeology free when you sign up for their newsletter.